Sunday, October 30, 2016

Spring Blooms on point setting

Someone asked in a comment on my Spring Blooms tutorial yesterday if it was OK to use a different fabric for the setting triangles if the the blocks are set on point as I did in my quilt.  My first reaction was "Of course!  It's your quilt, do what you want!".

I still feel that way, but after reflection, it occurred to me that the question was more about what it would look like.  If you're looking to reproduce exactly what I did, then no, you can't switch fabrics.  It will look different if you use different fabric for the setting triangles than you did for the block background.  Using the same fabric floats the blooms on the quilt.

However, if you're not looking to reproduce exactly what I made, have fun with it.  I fired up EQ7 and colored the triangles differently to give you an idea what things could look like.


I rather like it this way.  If I ever make this quilt again I think I'll choose different facbric for the setting triangles.  It's a little less modern, but I like the way the triangles bracket the center.  I also like the darker shade of the same color for the binding in the last two examples, to frame and contain everything.

So go ahead, play with color!  I'd love to see your finished quilts.  Please share!  Would it help if I started a Canuck Quilter facebook group?

Sunday, October 23, 2016

Tic Tac Hoot!

Tic Tac Hoot was the last Tic Tac Who? quilt I designed.  I had the other two finished when my daughter suggested an owl version.  I love owls!  I think it dates back to being a Brownie leader in Halifax in university.  My leader name was Sleepy Owl. It's a long story, but I promise I was wide awake and enthusiastic!

Tic Tac Hoot quilt by Canuck Quilter Designs
Tic Tac Hoot


Tic Tac Hoot turned out very well in the end, after a very slow start!  My first attempt at designing an owl yielded something that looked more like a bat, and definitely wasn't baby-cute.

Owl block looks like a bat
Imagine this guy in black and you've got a bat!
I tweaked a little and came up with something I thought would work so I stitched him up in fabric.


Oh, that beak! This looked more like an owl but something was off, so I tried again.


I was getting closer to a finish!  I popped him into the quilt layout on the design wall...


I really thought the green background and the darker sashing would work, but once it was on the wall, I couldn't bring myself to start sewing everything together. It stayed up on the wall a few days, and still I didn't want to sew it up, which was a pretty good sign that I wouldn't be happy with it this way.

I decided that the green background behind the owl was the problem. It didn't "float" the owl on the quilt and it interrupted the diagonal of floating blocks created by the X blocks.  Also, it doesn't seem so in the photo above, but the X blocks disappeared a bit on that darker background.  Back to the shop I went, to buy the fabric I had briefly considered for the sashing and discarded as too bland.  I also chose slightly lighter browns for the owl.


Tic Tac Hoot owl block by Canuck Quilter Designs
Final version of owl block

Much better!  The lighter sashing/background softened up the look.

Tic Tac Hoot by Canuck Quilter Designs
Tic Tac Hoot quilting 

Again, I quilted with my walking foot.  The owl is stitched in the ditch. For the rest of the quilt I started an all-over design, but didn't like how it played with the quilt as a whole.  Next I tried circles, then decided to do squares instead, then picked out the 7 squares I had finished and went back to circles!  Oh, and I found a spot where I had picked out a seam to fix some alignment then somehow missed re-sewing part of it.  Really?  I practiced a little bit of hand stitching to fix that little oops.


I think you get the idea that this quilt made me work a little harder than the other two!  It isn't a harder design.  I guess I was just due for a few quilting hiccups.


I was very happy to finally get the binding on.  That part went smoothly at least!  I love these little green dots, and the brown and leaf print for the backing.

Now all that's left to do is to finish the pattern!  Almost done. If all goes well, I'll be sending out to testers by the end of the week.

Saturday, October 22, 2016

Tic Tac Quack!

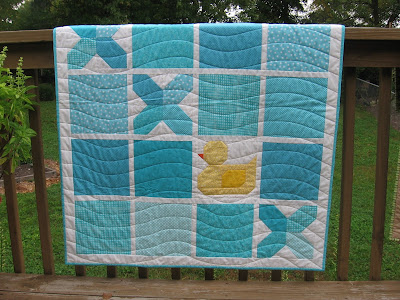
It's Tic Tac Quack's turn today.  This one has the easiest focus block of the three Tic Tac Who? quilts.

Tic Tac Quack by Canuck Quilter Designs
Tic Tac Quack

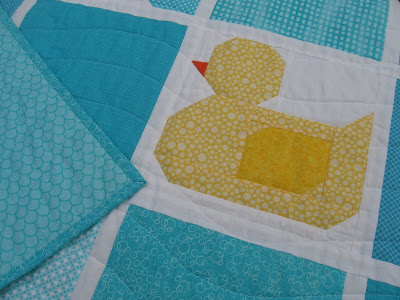
You might remember my first rubber duck block attempt yielded a rather chubby duck. I'm glad I went back to the drawing board.  This one fits the space just as I hoped.

Tic Tac Quack by Canuck Quilter Designs - close up of duck block


 Tic Tac Quack by Canuck Quilter Designs - quilting detail

I tried to quilt random wavy lines for the waves.  I've seen lovely quilting like that, but whatever I was doing didn't do the trick.  It looked like one big mess.  I ended up ripping out the quilting (I quit after finishing about a quarter of the quilt, so it didn't take to long to rip out) and starting over after marking lines.  I used a flexible curve, the kind used in drafting I think, to copy the curve.  This, like most of my quilts, was quilted with a walking foot.

Tic Tac Quack binding and backing


I don't know if you can make out the detail in the binding.  I used the same bubble print as in the square right below the duck. It reminds me of bubble bath.  When my kids were little, rubber ducks and bubble bath were a great bath time team.

Have a great weekend!  I hope you'll drop in to see Tic Tac Hoot! in more detail tomorrow.

Friday, October 21, 2016

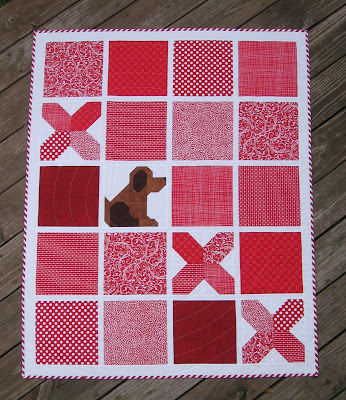
Tic Tac Woof!

Where did the week go?  I had planned to share individual posts of my Tic Tac Who? quilts during the week but here we are, Friday, and I'm just now getting around to it!  So without further ado...

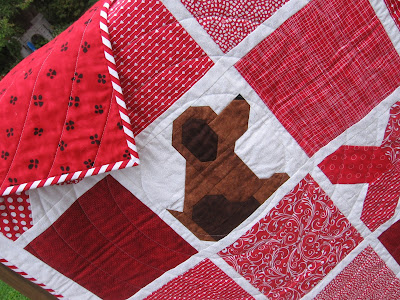
Tic Tac Woof! by Canuck Quilter Designs
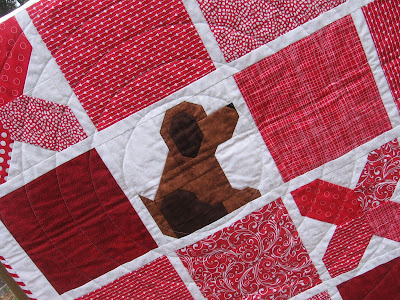
  I really wanted something simple that wouldn't compete or overpower the very simple design.  The fabrics and the puppy are the stars here.  My trusty walking foot came out to play again.  I'm sure if you've followed my blog for a while, you're not surprised!  This time I quilted concentric circles, centered on the puppy block, and kept echoing until the whole quilt was quilted.

Concentric circle quilting

Puppy quilt block in Tic Tac Woof! by Canuck Quilter Designs
A closer look at the puppy block

The pawprint fabric, in red, was just hanging around the sale room waiting for this quilt to come along, and my coworker Amy suggested the red striped binding.  I think it was the perfect finishing touch!

Tic Tac Woof! backing and striped binding

Happy Quilting!

Friday, October 14, 2016

Tic Tac Who?


Last winter several customers at the shop where I work were looking for baby quilt patterns with something cute but not applique.  Quick and easy but not just squares.  Oh, and small enough to be able to use a single length of regular width (42"-ish) fabric for the back.  The wheels in my head started turning.  With other projects in the works, it took a while for these ideas to become finished quilts, but here they are at last, each 38" x 47".  I love how they turned out


Tic Tac Who? quilts by Canuck Quilter Designs
Tic Tac Quack, Tic Tac Hoot and Tic Tac Woof


The pieced focus block is the only slightly challenging part of each quilt.  The duck is the easiest, followed by the puppy, then by the owl.  I quilted them with my walking foot on my domestic machine, and kept the quilting simple to continue the "simple" theme.

I think I'll give each quilt its own post over the next few days to share lots of pictures.


All three block designs will be included in one pattern Tic Tac Who? The pattern is about 3/4 finished, then I'll be looking for volunteers to test the blocks and/or quilt.  Let me know if you're interested!

Linking up with

Sunday, October 9, 2016

When the wrong side is the right side

On Friday, I dove into a new project and was sewing merrily along when I realized I had just sewn three pieces wrong side up.  Argh!  I thought not-nice things and grabbed my seam ripper.  Before I got to the ripping part, I was smiling again and doing a little happy dance.


Here's the fabric I chose for my new project.  I need a light, a medium and a dark grey.  I spent a lot of time looking for just the right ones.  The light and the dark were perfect, just what I had in mind.  The medium grey, not so much.  The texture was right but it was too close to the dark.  It was the best I could find, so I settled for it.

Light, medium and dark, all right side up

 Just before I unpicked that offending unit with the grey sewn in wrong side up, my brain registered the color of the wrong side.  I looked more carefully and did a happy dance.  The wrong side is just what I was looking for and couldn't find!

Here, the medium fabric is "wrong side" up

I did rip some seams, but not the ones I had planned.  I ripped the ones that had been sewn "correctly" according to the original plan and sewed them up again "wrong". The big challenge now is to remember that the "wrong" side of this medium gray is actually the "right" side in this project.  I have had to rip at least once when I forgot, but things are shaping up.


Tuesday, October 4, 2016

Last minute tote bag

Less than a week before leaving for the SewPro convention in Chicago in September, it dawned on me that I might need a bag to lug around a notebook, samples of my patterns, business cards (yes, I have business cards now - I feel all grown up!), maybe a light sweater.  I could have grabbed one of the kids' backpacks, but somehow that didn't project quite the image I hoped for.

So, with less than a week to go and plenty of unrelated things to finish up before I left, I just had to make a bag!
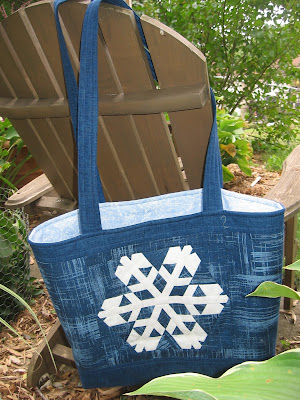
Snowflake tote bag
Snowflake tote, side 1
I think it came out pretty well, considering I winged it with no pattern.  I decided to use some of my snowflakes to dress it up a bit.  This one is Snowflake 7, version 4. 

Flip the bag over to see Snowflake 7, version 1.

Snowflake tote bag, side 2

I am particularly proud of the zippered pocket I added.  I could add slip pockets easily, as I have added such pockets to my small purses so had an idea how to proceed, but I didn't want my wallet to fall out unnoticed. I watched this tutorial and this one, took a deep breath and cut gave it a try.  Ta-dah!  A zipper!  With an actual pocket behind it too.

zippered pocket
Inside of tote bag, with zippered pocket!

I also added a clip to hold my keys .  Note to self:  next time put that clip higher up. This one is so far down the bag that it isn't any easier to fish out my keys than if I just let them drop to the bottom of the bag.

swivel hook for keys
Swivel hook for keys

Since I haven't made very many bags, I wasn't sure what to use as interfacing, but after much browsing online I settled on Shape Flex fused to the lining fabric and fusible fleece fused to the pieced outer shell.  It ended up being just about as stiff as I wanted, halfway between totally floppy and standing up stiff all on its own. I went ahead and quilted the outer shell too, just to add some nice finishing details.   Oops, missed a picture of that, and the lighting isn't very good to take some right now.  Just take my word that it looks fabulous!

The bag was good conversation starter, and Lissa said it's what she used to spot me in a crowd!

Speaking of Lissa, she is starting a Fandango/Tula Pink quilt along, blogging about it on Tula Tuesdays.  I have a long list of things I'm not getting to so I can't add another project, but I can cheer her on from the sidelines! Pop on over there and take a peek and tell her Joanne sent you.

Happy quiting!
Joanne