 |
| The sails in this block from my Sailing School pattern are made from HRT units |
Here, as promised, is my tutorial about making half-rectangle triangle units (HRT) without specialty rulers. This method does involve a bit of fabric waste as the units are made a little over-sized, then trimmed down. I think the little bit of trimming waste in exchange for ease and accuracy is worth it.
Traditionally, the HRT is twice as tall as it is wide, so those are the dimensions I worked with.
Here goes!
Step 1: Determine the desired finished size of the unit. (Remember that the finished size is the size in the finished project, after the seam allowance is taken up by sewing the unit into the project.)
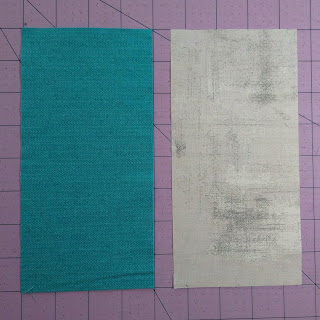
Step 2: You will need two rectangles of fabric. To determine the width of the cut rectangles:
- For the cut width, add 1 1/4" to the desired finished width.
- The cut height will be double the cut width.
 |
| Step 2: Cut two rectangles |
Step 3: Mark a diagonal line on one of the rectangles. Careful! The direction of the line matters.
- For a left-leaning seam on the finished unit (from upper left corner to lower right corner), draw the line from the top right corner to the lower left corner.
- For a right-leaning seam on the finished unit (lower left corner to upper right corner), draw the line from the top left corner to lower right corner.
Step 4: (optional ) You will actually stitch 1/4" away from the marked line in Step 7. You may wish to draw additional lines now, 1/4" on each side of the diagonal, to mark where to stitch. If you have an accurate 1/4" presser foot as a guide you can skip this part.
 |
| Steps 3 and 4: Mark one rectangle |
Step 5: Place the marked rectangle on top of the second rectangle, right sides together. So far this looks very much like the technique used to make HST. However, if you now simply sew 1/4" on each side of the diagonal, you will end up with a kite shape rather than a rectangle shape.
 |
| Step 5: Layer rectangles right sides together |
 |
Not how you want it to turn out. Move on to step 6.
|
Step 6: Rotate the marked rectangle:
- to the left (counterclockwise) for a left-leaning finished unit, so that the upper right corner shifts to touch the upper left of the bottom rectangle, and the lower left corner shifts to touch the lower right corner of the bottom rectangle.
- to the right (clockwise) for a right leaning finished unit, so that the upper left corner shifts to touch the upper right of the bottom rectangle, and the lower right corner shifts to touch the lower left corner of the bottom rectangle.
 |
| Step 6: Rotate marked rectangle |
To check that you have rotated in the correct direction, fold the top rectangle along the marked diagonal, and see if the result is approximately the HRT you plan to make.
 |
| Check orientation |
Step 7: Sew 1/4" on either side of the marked line, then cut on the marked line.
 |
| Step 7: Sew then cut into two units |
Step 8: Press seams to one side or open, as you prefer. You now have two rough units ready for trimming perfectly to size.
 |
| Step 8: Two untrimmed HRT units |
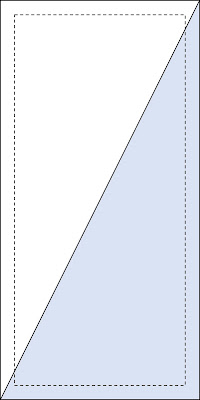
Next, you'll need to trim these. The tricky part is to position that diagonal seam correctly in the trimmed unit so that points don't disappear into the seam allowance when you sew this unit into your quilt. The diagram below shows what happens when you place the seam corner to corner. The seam, shown as a dashed line, cuts off points on the short ends of the unit.
 |
| What you want to avoid |
I've found that using a template to guide my trimming gives me the best results.
PREPARE A TRIMMING TEMPLATE
Step 9: Draw a rectangle exactly the same size as your desired finished unit.
Step 10: Using a rotary cutter and ruler, cut out the shape 1/4" outside the drawn shape all around.
 |
| Step 10: Cut out template |
Step 11: Draw a diagonal between two opposite corners of the
drawn inside shape in the direction of the seam in your finished unit, extending the line
all the way out to the edges of the cut shape. Note that this diagonal does not intersect the corners of the cut shape.
Step 11: Tape the template on the underside of your quilting ruler, with the template flush with the corner of the ruler, and the drawn line visible through the ruler.
Step 12: Position the template over the rough unit so that the drawn diagonal lines up with the seam in the unit.
 |
| Step 12: Position the template |
Step 13: Use a rotary cutter to trim the unit along the side and top edges of the ruler.
 |
| Step 13: Trim two edges |
Step 14: Rotate the unit. Position the ruler so the markings for the required unfinished size line up with the trimmed edges.
 |
| Step 14: Position ruler to trim remining sides |
Notice that the seam will not fall exactly in the corner of the ruler.
 |
| Seam will not go through corner of the ruler |
Step 15: Keeping the ruler in position, use a rotary cutter to trim the remaining sides of the unit.
The unit is now ready to use. The area outside the black outline in the image below is the seam allowance. The area inside the black rectangle will be the finished unit as it will appear in your finished project, with the points in the corners where you want them.
I hope you have found this helpful. Now go play with some half-rectangle triangle units!
***************
You can use HRT in many ways. The sailboat block at the top of this post, and again below, is what made me sit down and figure out HRTs.
This version is 9" square. If you'd like to make it but would prefer to skip all the math and drawing of templates, I've done the work for you in my
Sailing School pattern. See more of that quilt in
this post.
You can purchase a PDF download of the pattern in my
Etsy shop, or you can ask your favourite quilt shop to order a print copy for you.
Happy quilting!
Joanne


Great tutorial!
ReplyDeleteGreat tutorial Joanne; I must try it this way - I usually slice, then sew them together but this looks a little less messy! Love the sailboats in amongst the 'temperature quilt' waves!
ReplyDeleteI have become a big believer in creating large and trimming down to size.
ReplyDeleteThis is great information; I will definitely put this in my favorites folder for future reference! Thankis so much!
ReplyDeleteThanks for expalining HRT´s so wonderful, now I can imagine what was going wrong all the time.
ReplyDeleteThank you for sharing your process for successful "sail" construction! I am about to start a nautical quilt and will use your process. Many thanks for figuring this all out and sharing!
ReplyDelete