Friday, December 11, 2020

Love and Kisses Blog Tour

When Sherry Shish of Powered by Quilting was putting together a group of bloggers to showcase her new signature collection of batiks from Island Batik, I was thinking of making a new version of Stellar Breeze.  Perfect!


This is Stellar breeze in Love and Kisses fabric provided by Sherry and Island Batik. I loved working with these fabrics. They are crisp for cutting and pressing, but the finished quilt doesn't feel stiff.  And the colors and prints are so, so pretty.  I'm not sure my camera captured the colors quite right, but you get the idea. 


I'm sure you notice I quilted this very lightly.  This was one of those "quiet" quilts.  It just wouldn't tell me what to quilt.   Actually, it did say something about all-over swirls, but I'm terrible at those so I told the quilt to go back and think a little longer.  Well, it didn't get back to me in time for the blog hop deadline, so I started just stitching in the ditch, hoping inspiration would strike while I did that. Guess what?  My mind stayed blank.  I let it sit a day, then decided that outline stitching outside the aqua stars might help emphasize the suggestion of curves, so I did that.

The outline stitching did dress things up a little bit, though very simply. When I stood back and looked at it, I rather liked the simplicity.  I see so much intricate, beautiful custom quilting online that I often feel like I need do more, but sometimes something simple and quiet is all that's needed. This quilt was a good reminder.  Close up, these fabrics and quilt design are pretty enough to shine all on their own. The minimal quilting doesn't look like much in the photo, but it's just about right draped over the living room couch.

That said, I do need to go back and add a little bit of quilting, because those outside half-octagons are definitely large than the minimum quilting distance recommended for Hobbs 80/20 batting.  I'm still not quite sure what I'll quilt there, but I went ahead and bound the quilt so I could show it off  share it in the blog hop.  Whatever specific design I end up with, I'm pretty sure it will involve simple, clean lines.

Oh! Oh! I can't believe I almost forgot!  I had enough scraps left over, with the addition of a little more Island Batik left over from a quilt back, to piece a back.  I think I like it as much as the front.


The Stellar Breeze pattern is available for purchase in my shop.  It has instructions for 5 sizes, and includes templates to use if your ruler collection doesn't include Tri-Recs tools or similar rulers for making triangle-in-a-square units.  If templates make you turn away, check out my recent  posted a tutorial on an easier way to cut shapes with paper templates, no scissors required.

I invite you to visit other bloggers on the Love and Kisses blog hop (links listed below).  It's always great fun to see the very different projects made with the same line of fabrics.  Love and Kisses is in shops now for you to create with as well.


Thursday, December 10, 2020

A better way to use paper templates

Every now and then I want to make a quilt that uses shapes with angles that are not marked on my quilting rulers. 

My Clear Skies quilt from 2013, from the pattern Kyoto Garden by Judy Martin in her book Stellar Quilts.

I'm not a fan of tracing paper templates onto fabric and cutting out the shapes with scissors.  If instead I trace around a paper shape with a rotary cutter, I tend to end up with a gradually smaller template as I accidentally shave a little off the template, which is also problematic. However, as long as the shape doesn't involve curves, there's an easier way, as I learned from Judy Martin's book Stellar Quilts when I made the quilt above seven years ago.  I can tape the template to my ruler and use the straight edge of the ruler to rotary cut a nice, clean edge.  

To demonstrate, I'll use the templates shown below from my Stellar Breeze pattern.  You could also use specialty rulers for this particular shape, but not everyone has the budget for those.  Plus, once you figure out this technique, you can use it for other templates that may not have a ruler substitute.


Pairing paper templates with a ruler

Step 1: Make sure that the template has been printed to the required size. In my patterns, and many others, template pages include a plain square as a size reference and the pattern specifies what size the square should be.  Use a quilting ruler to check that the square is the right size.  If it is, then the rest of the printing on the page should be as well.

Step 2: Carefully cut out the templates.  I use my rotary cutter and a quilting ruler lined up with one side at a time to get clean, straight cuts.


I'm going to demonstrate first with the G/H template shown above.  

Step 3:  Use a fabric strip cut to the width specified in the pattern.  Fold the strip in half, wrong sides together, and square up the cut end of the folded strip.  Keep the strip folded.  Place the template on the strip at the cut end.  In this case, the left side and bottom edges can line up with the left and bottom edges of the fabric strip.


Step 4:  You can now see that the long diagonal is the edge you'll want to cut.  Tape the template to the underside of a quilting ruler, with the template's long diagonal flush with one edge of the ruler.


Step 5:  Place the ruler over the fabric strip, lining up the template with the fabric again as you did in Step 3.


Step 6: Use your rotary cutter to cut along the long side of the template.


Step 7:  To cut a second piece, rotate the ruler and line up the template with the previous cut...and discover that the side of the template where you need to cut to complete the next piece is in the middle of the ruler.  You just can't make that cut this way.

You could remove the template and reposition it, but unless these are the only two pieces you need, you'll be reposition things a lot.  Instead, make a second copy of the template and continue to step 8.

Step 8: With the side you need to cut lined up flush with the edge of the ruler, tape the second template to the ruler.  Just make sure it doesn't overlap the first template.  I marked the second template with a large red asterisk to make it easier to keep track.  Now you can line up the template with the previous cut again, and have a ruler edge where you need to cut to complete the second shape.


Step 9: Rotate the ruler to use the first template again to cut the next piece, than rotate to the second template to cut the next.  Continue cutting pieces on this way, alternating templates.

Step 10:  Remember that you cut through two layers of fabric because the strip was folded in half, so each cut yielded two pieces.  Because the two layers of fabric were wrong sides together, the two pieces are mirror images of each other, which is exactly what you need for a triangle-in-a-square unit.


Trimming Points

You may have noticed this template has angled cuts at the tips.  These are meant to help you line up the parts of the triangle-in-a-square properly.  If your template includes trimmed points to help you properly line up components when piecing, you can use this technique for trimming points as well. 

Step 1: To add these cuts to the G/H pieces, simply reposition the template (or a another copy) so the cut is flush with one edge of the ruler.


Step 2:  Position the ruler so the template matches the cut shape.


Step 3:  Use your rotary cutter to trim away the tip that extends past the ruler and template.


Step 4:  Repeat steps 1-3 for the remaining trimmed tip.


Another example, just to get the hang of things!

Cutting the large triangle (Template B) from my pattern follows the same steps.


You can see the second side of the triangle is under the middle of the ruler where you can't cut.


Simply rotating the ruler doesn't properly line up the angles of the template and cut strip. Because this shape is symmetric, you could flip the ruler so the template is on the top side of the ruler, but then the template is not right on the fabric.   I find it harder to line things up exactly when the template is floating a ruler thickness above the fabric, so I prefer to use a second template to position the cut for the second side of the triangle.  Again, I've marked the second one with a red asterisk.


Keep alternating between templates at each cut to cut additional pieces.  Don't worry about mixing up the templates.  If you try one and can't line it up to cut a triangle, you'll know to use the other instead.


I've shown you how to pair these two templates with a ruler, but you can extend this to other templates.  Just remember that you need to match up the side of the template where the cut will be made with the edge of the ruler, and that you can use multiple copies of the template for different angles and sides.

I hope this helps you try out some new patterns and ideas. Please feel free to send me an email if you have any questions, or to share what you've made with this technique.

Tuesday, December 8, 2020

Moving things around

I have been moving things around, and I don't mean on the design wall. 

My sewing and work space has slowly been running out of storage space and becoming cluttered.  I don't function well in clutter. Something had to be done, but I couldn't figure out what.  I have limited space, especially now that my husband is working from home.  Wednesday evening, as I was working on a pattern and getting distracted by the mess, it occurred to me to get a measuring tape and check to see if the cutting table really was too big to move to the center of the room.


Ha!  I don't know why I didn't try this before.  I always assumed it was too big and would make moving about the room awkward.  I never actually tried it or measured to see.  I measured on Wednesday evening, and informed my half-awake husband of all of my fine new plans at 12:30 a.m. when I slipped into bed.  I waited until daylight Thursday morning to actually start hauling the furniture around.  It turned out the table fits in the center just fine. I now have access to 3 1/2 sides of the table for cutting and basting.  Woohoo!

The part I'm even more excited about is the extra wall space liberated for added shelving. I was able to order two more shelving units to match my existing ones, though that took a bit of online browsing.  They were sold out on several sites I searched.  Maybe I'm not the only one trying to tidy up and organize my space before winter and cabin fever sets in.  The shelving isn't fancy, or super pretty, but it is tidy and organized and affordable. It also fits exactly along the length of wall, as though it was meant to be.


Moving the table did require relocating a small bookcase to my husband's half of the room, but I wanted to keep the contents easily accessible on my side, so I added  a new cubby storage unit. The books fit easily, with extra space left for things that are more usefully stored closer to the cutting and ironing surface.  I was even able to attach the extension arm I plan to use to photograph (and maybe video?) tutorials.  


There's room for Rosie's bed, but she is not a fan of change.  She seems to not be happy that it has moved, and she is spending more time on the chair, under the printer, or just random spots on the floor as you see above.  She's sighing a lot and giving me dirty looks.

I, however, am thrilled with the changes.  I feel refreshed and ready to attack a long list of sewing and pattern writing tasks.  First on the list is finishing the binding on my quilt for the Love and Kisses blog hop. You can see it on the table, waiting patiently.  My stop on the tour is this Friday, so I'm not late yet.  Next up after that is a tutorial on using paper templates with rotary cutters. That's been in the plans for months now, and I just need to stop thinking about it and just make it.  As you can see on the design wall, my temperature quilt is in serious need of attention.  It hasn't progressed past the end of August!  What can I say, things got busy here even if the blog hasn't been!

What are you up to on this fine December day? 

Tuesday, November 3, 2020

UFOvember

On Sunday, Bobbie from Geeky Bobbin wrote about "things that lurk in the closet taking up space and emotional energy".  She was not referring to Halloween ghosts and ghouls, but to our UnFinished Objects, those quilt projects that we were so excited to start but somehow never finished. In an effort to help us bring them out into the light, she has dubbed this month UFOvember and invited us to take inventory then resume, rework or rehome our UFO's.

I'll manage the inventory part just fine.  I'm not so sure about those 3 R's, but at the very least, taking inventory might help me put the brakes on new "just because" projects and encourage me to work in a few older projects in my leisure sewing time over the next few months.


UFO's have many manifestations.  They might be cut fabric that never reached the sewing machine.  Others are blocks and block parts that didn't graduate to quilt top status. Finally there are the quilt tops that never got quilted.  Looking at my UFO collage I think you can guess where my projects get stuck! Looking through my project bins confirmed that I have no UFOs in pieces and parts.  They are all finished tops, languishing, waiting patiently for me to quilt them.

I remember a time when I wouldn't start a new project until I had quilted and bound the one I was already working on.  I felt very virtuous. That was a long time ago.  At various times over the last 15 years I have had a stack of tops languishing, then got mostly caught up, but I have never been back down at zero.  I've come close, but the lure of the next project always proved too strong.


This citrus version of Focal Point is the oldest UFO in my studio.  I pieced it in spring 2015 as a test piece for my first magazine publication (American Patchwork and Quilting June 2016).  By the time I had custom quilted the three different versions the magazine published, I was all out of inspiration and this one was tucked away in a box.  Every time I thought about pulling it out and finishing it, another deadline would crop up and this poor little runner went back to the end of the line.  I still love the fabric choices and desig, and I want to finish it, but I still have deadlines.  In fact, I seem to be accumulating deadlines as Canuck Quilter Designs picks up steam. Maybe I need to start thinking about re-issuing this pattern on my own to nudge this piece over the finish line.  Perhaps a Spring 2021 pattern release deadline?


Next up is my RSC Butterflies quilt.  I started this one in January 2017 as a Rainbow Scrap Challenge project. I designed the block (see the tutorial here) and happily pieced a block a month.  I didn't sustain my enthusiasm for 12 months, but the 9 blocks I made turned into a quilt top in January 2018, after much debate about the layout.  It sat for a year as I pondered how to quilt it, then I decided to use my quilting rulers to machine quilt it.  I pulled it out, promptly decided I hated the layout I chose, wished I had chosen differently, and put the quilt away again.  I finally started quilting it earlier this year but I'm still not excited.  It's back in the UFO pile.  It isn't a candidate for rehoming, as hubby likes it, so I will eventually finish it, but I think it is firmly in UFO territory.


The rather uninspiringly titled "Tiles" is also in the UFO pile because of flagging enthusiasm.  This one was supposed to become a pattern.  I pieced it very quickly over the course of a week in May 2018 and was thrilled with it.  Right about then other life priorities took over for a bit, and by the time I came back to this to quilt it and write the pattern, it didn't make my heart sing anymore.  I have the backing and the fabric for the binding, to match the triangles on the edges, but I just can't muster up any enthusiasm for it.  At the same time, I love the fabrics.  The picture doesn't do these Northcott shimmer fabrics justice.  So, it's a 50/50 split between rehoming and hanging on a little longer in case inspiration strikes again.


My other remnant from 2018 is this ombre runner.  I wanted to play with ombre fabric, and I wanted to try making prairie points from a strip. This doesn't suit my home at all and I set it aside to see if it would grow on me.  Turns out it hasn't.  Unlike Tiles, this one didn't really excite me much as I was piecing it, so I suppose it shouldn't be surprising that I can rehome it with no regrets.  This one will find its way to the guild "free stuff" table when in-person meetings resume eventually.

The rest of my unquilted top UFOs are all casualties of lack of time.  I haven't set them aside because I've lost interest. As more of my quilting time becomes taken up by sewing samples for my patterns, less urgent projects get booted to the back of the line.


Connecting Geese is a fine example.  I had to piece it quickly to test the pattern before sending it off to Connecting Threads in April 2019, but it didn't have to be quilted, as Connecting Threads would make its own sample with their featured fabric collection for the November 2019 catalog. Quilting cover quilts for my independent pattern releases came first.  I do love the rich colors in this top, and am sorry I didn't get it quilted up in time for this fall season as I had planned.  With that in mind, is it bad of me to already be plotting a second version, using frosty blue fabrics I used for these placemats?

Is a project a UFO if it is less than a year old?  That would be a personal judgement call, I suppose.  I'm slapping the UFO label on any project that has come to a screeching halt with no idea when I might pick it up again.  I found it rather disconcerting to realize quite how many I created this year alone.


Next up is the impulsive project. I had been drooling over these Botanical Blues florals from Connecting Threads for a while and bought some for a different design that I ultimately decided to shelve.  I just couldn't not use this fabric.  It was just too darn pretty, and well, blue.  I love my blues!.  Since my original Cascade, made modern in greens on a black background, had come together so easily and quickly, I thought the pattern was a good candidate for a quick "just because" side project.  It was, except that I didn't have time to quilt it, so it's another UFO.  But someday I'll make time, and it will be gorgeous, so I'm keeping it! 


My original Cascade resulted in another UFO.  I pieced scraps from the top to make a scrappy back for it, but I liked it so much I decided to keep it as a separate top. I think I'll call it Waterfall, but it's not getting quilted anytime soon.  I think my son would love this at some point, so it may get finished for his first apartment after college graduation.  I have a couple of years to squeeze it in.  It's a long range plan, but a plan!


My first version of my Shuffle placemats went into the UFO stack when I realized the three greys I chose for the accents didn't show up as very different in the photo.  As the three shades were meant to be a feature of the pattern, I decided to make a different set for the pattern cover.  These blue and grey ones are still lovely thoufgh, and since I have the backing, batting and binding all cut and ready to use, I think these will migrate off the UFO stack before Christmas.  I'm sure I can think of someone who would love these.  Another plan!  I may shrink the UFO stack after all!


These curvy sunflowers from Sew Kind of Wonderful using their mini quick curve ruler were on my "want to make" list for a long time and I treated myself in March, when the pandemic hit and I needed some down time.  I had expected to have it quilted by now, and I'm sorry it's in the UFO pile. It is, as so many of my tops are, a casualty of my pattern sewing.  Meeting deadlines took precedence this year as I work to build my design business.  However, I do love it and I know just how I want to quilt it.  I'm going to save it for when I need some down time again.  I'm sure the winter blues will need to be chased away sometime in the next few months, and these sunflowers will be the perfect project to help with that.

Well, I'm not sure my inventory has been terribly helpful for you, but it has helped me get a grip on what's lurking in the bins.  It turns out the stuff lurking in my UFO pile may be taking up space, as Bobbie wrote, but looking through the projects has actually recharged my energy instead of using it up.  I'll let go of the one project I really don't like anymore, give some thought to rehoming one, and resign myself to finishing the butterflies.  All the rest have me itching to fire up the sewing machine, so it's all good!

I hope you will take the time to visit the rest of the UFOvember bloggers this month.  Some will focus on inventory, while others will focus on one of the three R's (resume, rehwork, rehome).  I'm going to enjoy seeing what's in everyone's UFO stack and how they tackle it. I suspect many will be more proactive  than me!


Blog Hop Schedule

November 1 – Bobbie Gentili –  Geeky Bobbin
November 2 – Becca Fenstermaker – Pretty Piney
November 3 – Joanne Kerton – Canuck Quilter
November 4 – Sue Griffiths – Duck Creek Mountain Quilting
November 5 – Ashli Montgomery – Me and Coach
November 6 – Anne Boundy – Said With Love
November 7 – Sarah Ruiz – Sarah Ruiz Quilts
November 8 – Teresa Weaver – Your Sewing Friend
November 9 – Karen Brown – Just Get It Done Quilts
November 10 – Bobbi Bridgeman – Snowy Days Quilting
November 11 – Raylee Bielenberg – Sunflower Stitcheries
November 12 – Althea Gyde – Blue Heron Quilting
November 13 – Kenzy Hogan – Sewing Corals
November 14 – Leanne Parsons – Devoted Quilter
November 15 – Jessica Caldwell – Desert Bloom Quilting
November 16 – Laureen Smith – Tourmaline & Thyme Quilts
November 17 – Karen Kehl – Better Done Quilts
November 18 – Stacey H – Two Terriers Studio
November 19 – Cinzia White – Cinzia White Designs
November 20 – Laura Piland – Slice of Pi Quilts
November 21 – Rachel M – The Barefoot Crafter
November 22 – Kathryn LeBlanc – Dragonfly's Quilt Shop
November 23 – Judit Hajdu – Quiltfox Design
November 24 – Lyra McCabe – Quilting McCabe
November 25 – Jill Therriault – Stitching in Heels
November 26 – Cristina De Miranda – Ships and Violins
November 27 – Kate Starcher – Katie Mae Quilts
November 28 – Valerie Prideaux – Cozy Funky Cool
November 29 – Kim Mastromartino – School of Line Design
November 30 – Natalia Knowlton – Nerdy Quilter

Thursday, October 22, 2020

Pumpkin Patch Time

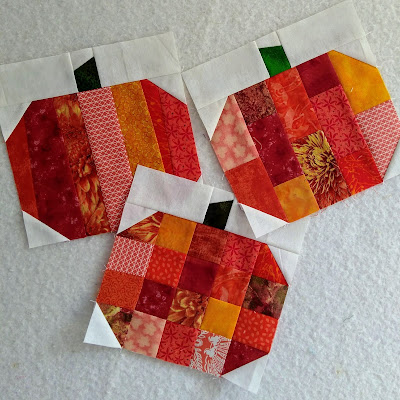
Earlier this month my husband and I took an afternoon off and drove out to the local apple orchard/pumpkin patch.  The leaves had not yet turned but the pumpkins were ripe and orange...well, except for those white ones, but I like my pumpkins orange so I ignored the "bleached" ones! I enjoyed my long walk through the corn maze and the field of sunflowers, the wagon ride through the pumpkin patch, and ate a few too many apple donuts.  It was a perfect afternoon and the outing nudged me towards the right frame of mind to enjoy fall instead of grasping at summer.

3 patchwork pumpkin blocks

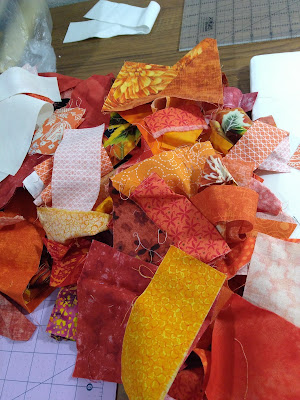
When I got home I was ready for some fall-themed sewing.  I already had several fall throws featuring leaf blocks, and a trio of table runners showcasing fall fabric and colors, but I didn't have any pumpkin décor.  Freshly inspired by the pumpkin patch, I dug through the orange scraps to see if I could remedy the situation.

A pile of orange fabric scraps

I found, happily, that I had more variety in my orange scrap collection than I thought.  I don't know where they all came from, but at this point, I'm not really keeping track.  I just use them!  I spent an evening happily picking out what I thought might suit, then another evening sewing up the cute little pumpkin blocks in this post's first picture.

That took care of the urge to sew up some pumpkins.  I let them just hang out on the design wall, brightening up my studio for a few weeks until last weekend.  At that point I figured if I wanted to use them this fall, I should move the project along. 


I really liked the runner design with prairie point accents that I used for my Canada Day runner this summer,  so I thought I'd try it again for the pumpkins.  This one is a little shorter, with three rather than four blocks, but I think it's perfect for the pumpkins.  The green skinny border doesn't show well in this picture.  It's not as dark as it seems in the picture, and it breaks up the orange quite nicely while tying in with the green stems.

As you can see, it isn't yet quilted.  As always, deciding what to quilt killed the momentum.  After seeing the pretty texture Leanne's tiny stippling added to her Bloom piece, I'm considering using this runner for stippling practice. Or not.  I'm torn!  I really don't stipple well, so I could use the practice, but then I don't want to ruin this runner either, because I think it's kind of cute and it makes me smile.  

While I was pondering the quilting fate of the runner, I made a little detour by the computer to write up a quick pattern for the scrappy pumpkin blocks (not the runner) to share with my newsletter subscribers this weekend.  If you sign up before Saturday, the newsletter with the pattern link should make it to your inbox!

Meanwhile, tell me, what is your favourite fall décor, quilted or otherwise?

Happy quilting!

Joanne

Monday, October 5, 2020

Shuffle placemats and runner

I use placemats and runners on my table year-round. Switching them out to fit the season or occasion is an easy way to freshen up my decorating.  Shuffle was designed this summer, when I was pining for sandy beaches and ocean.  Though I was disappointed to miss my ocean visit this summer, my placemats captured a bit of that summer beach vibe.  


Strip piecing for part of the construction helped these come together quickly.  I easily cut and sewed the tops in a weekend, and quilted them the next weekend. 

Moda Grunge almost-solid fabrics gave this version a modern edge.  I love the way they turned out, but I know focus prints in the accents would look fabulous as well.  Or how about a focus print in the large square and coordinating small prints or textures in the rest?  That's what tester Debbie Crosby chose for hers.

Debbie Crosby's Shuffle placemats

Debbie did send photos without the feline inspector, but how could I not include him?

While I stuck to one color family for the accents, there's no rule about that.  Check out Tammy Howell's version.  It has me thinking of birthday cupcakes with coloured frosting.

Tammy's Shuffle placemats


You can see that Debbie, Tammy and I all used straight line quilting.  I can't speak for them, but I wanted to accentuate the diagonal direction of the accent pieces.  Also, straight line was quick and easy.  If you care to spend more time, the design does lend itself to sampling different freemotion designs, as Vivian McCagg's set showcases.


There is no reason to stick with a light-colored background.  Joanne Embury's placemats feature bold but effective colour.

Joanne Embury's Shuffle placemats

Buffie Lorah and Sandie L. both opted for print backgrounds and more solid accents for a different effect.

Buffie's version of Shuffle placemats

Sandie's version of Shuffle placemats

Thank you so much to all these quilters for their tests and feedback to help me produce the best possible pattern. 

Now that the pattern is published, I thought I might step away from the computer for a little while to get some sewing in, but first I made a little detour into EQ8 to plan some fall place settings.


I also played with Halloween prints, and Christmas prints, and kids' novelty fabrics, and a plethora of color options but I won't subject you to a core dump of my ideas!  I'm sure you have lots of inspiration of your own.  What color or theme would you make these in?

The Shuffle pattern is now available in my shop.  Get yours now through October 7th at 25% off the regular price.